ReentrantLock 公平锁与非公平锁的源码分析 --20210614

哈喽,大家好,我是指北君。

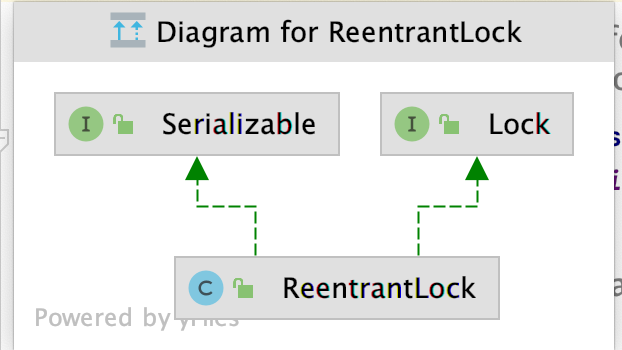
今天为你带来的是 ReentrantLock 公平锁与非公平锁的分析,它是 Java 并发包下的一个实现类,实现了 Lock 接口和 Serializable 接口。

初识

ReentrantLock 类有两个构造函数,一个是默认的不带参数的构造函数,创建一个默认的非公平锁的实现,一个是带参数的构造函数,根据参数 fair 创建一个公平还是非公平的锁。

1
2
3
4
5
6
7
public ReentrantLock() {
    sync = new NonfairSync();
}

public ReentrantLock(boolean fair) {
    sync = fair ? new FairSync() : new NonfairSync();
}

这里简单的说一下公平锁和非公平锁的定义:

  1. 公平锁:线程在同步队列中通过先进先出(FIFO)的方式获取锁,每个线程最终都能获取锁。
  2. 非公平锁:线程可以通过插队的方式抢占锁,抢不到锁就进入同步队列排队。

NonfairSync 类和 FairSync 类继承了 Sync 类,它们三个都是 ReentrantLock 的内部类。

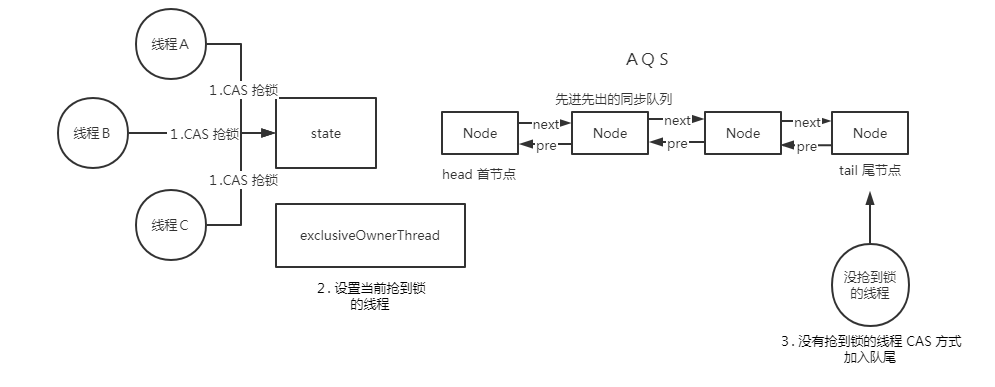
AbstractQueuedSynchronizer,简称 AQS,拥有三个核心组件:

  1. state:volatile 修饰,线程是否可以获取锁。
  2. Node:内部队列,双向链表形式,没有抢到锁的对象就进入这个队列。 主要字段有:pre 前一个节点,next 下一个节点,thread 线程,waitStatus 线程的状态。
  3. exclusiveOwnerThread:当前抢到锁的线程。

如下图,简单的了解一下 AQS。

1
2
3
4
5
6
7
8
//继承了 AQS
abstract static class Sync extends AbstractQueuedSynchronizer

//继承了 Sync 类,定义一个非公平锁的实现
static final class NonfairSync extends Sync

//继承了 Sync 类,定义了一个公平锁的实现
static final class FairSync extends Sync

公平锁

在分析公平锁之前,先介绍一下 Sync 类,它是 ReentrantLock 的唯一的属性,在构造函数中被初始化,决定了用公平锁还是非公平锁的方式获取锁。

1
private final Sync sync;

用以下构造方法创建一个公平锁。

1
Lock lock = new ReentrantLock(true);

沿着 lock.lock() 调用情况一路往下分析。

1
2
3
4
5
//FairSync.lock()
final void lock() {
    // 将 1 作为参数,调用 AQS 的 acquire 方法获取锁
    acquire(1);
}

acquire() 方法主要是干了 3 件事情

  1. tryAcquire() 尝试获取锁。
  2. 获取锁失败后,调用 addWaiter() 方法将线程封装成 Node,加入同步队列。
  3. acquireQueued() 将队列中的节点按自旋的方式尝试获取锁。
1
2
3
4
5
6
7
8
9
//AbstractQueuedSynchronizer.acquire()
public final void acquire(int arg) {
    //尝试获取锁,true:直接返回,false:调用 addWaiter()
    // addWaiter() 将当前线程封装成节点
    // acquireQueued() 将同步队列中的节点循环尝试获取锁
    if (!tryAcquire(arg) &&
        acquireQueued(addWaiter(Node.EXCLUSIVE), arg))
        selfInterrupt();
}

tryAcquire() 尝试获取锁,如果线程本身持有锁,则将这个线程重入锁。

1
2
3
4
5
6
7
8
9
10
11
12
13
14
15
16
17
18
19
20
21
22
23
24
25
26
27
28
29
//FairSync.tryAcquire()
protected final boolean tryAcquire(int acquires) {
    //当前线程
    final Thread current = Thread.currentThread();
    //AQS 中的状态值
    int c = getState();
    //无线程占用锁
    if (c == 0) {
        //当前线程 用 cas 的方式设置状态为 1
        if (!hasQueuedPredecessors() &&
            compareAndSetState(0, acquires)) {
            //当前线程成功设置 state 为 1,将当前线程放入 AbstractOwnableSynchronizer 的 exclusiveOwnerThread 变量中
            setExclusiveOwnerThread(current);
            return true;
        }
    }
    //当前线程本来就持有锁,进入重入逻辑,返回 true
    else if (current == getExclusiveOwnerThread()) {
        //将 state + 1
        int nextc = c + acquires;
        if (nextc < 0)
            throw new Error("Maximum lock count exceeded");
        // 设置 state 变量,当前线程持有锁,不需要用 CAS 设置 state
        setState(nextc);
        return true;
    }
    //当前线程获取锁失败
    return false;
}

hasQueuedPredecessors() 这个方法比较有绅士风度,在 tryAcquire() 方法中被第一个调用,它谦让比自己排队长的线程。

1
2
3
4
5
6
7
8
9
//AbstractQueuedSynchronizer.hasQueuedPredecessors()
public final boolean hasQueuedPredecessors() {
    Node t = tail;
    Node h = head;
    Node s;
    // 如果首节点获取到了锁,第二个节点不是当前线程,返回 true,否则返回 false
    return h != t &&
        ((s = h.next) == null || s.thread != Thread.currentThread());
}

addWaiter() 方法就是将获取锁失败的线程加入到同步队列尾部。

1
2
3
4
5
6
7
8
9
10
11
12
13
14
15
16
17
18
19
20
21
22
23
24
25
26
27
28
29
30
31
32
33
34
35
36
37
38
39
40
//AbstractOwnableSynchronizer.addWaiter()
private Node addWaiter(Node mode) {
    //将当前线程封装成一个节点
    Node node = new Node(Thread.currentThread(), mode);
    //将新节点加入到同步队列中
    Node pred = tail;
    if (pred != null) {
        node.prev = pred;
        // CAS 设置尾节点是新节点
        if (compareAndSetTail(pred, node)) {
            pred.next = node;
            //返回新的节点
            return node;
        }
    }
    //没有将尾节点设置为新节点
    enq(node);
    return node;
}

//AbstractQueuedSynchronizer.enq()
private Node enq(final Node node) {
    //自旋
    for (;;) {
        //尾节点为 null,创建新的同步队列
        Node t = tail;
        if (t == null) {
            if (compareAndSetHead(new Node()))
                tail = head;
        } else {
            //尾节点不为 null,CAS方式将新节点的前一个节点设置为尾节点
            node.prev = t;
            if (compareAndSetTail(t, node)) {
                //旧的尾节点的下一个节点为新节点
                t.next = node;
                return t;
            }
        }
    }
}

acquireQueued() 方法当节点为首节点的时候,再次调用 tryAcquire() 获取锁,否则就阻塞线程,等待被唤醒。

1
2
3
4
5
6
7
8
9
10
11
12
13
14
15
16
17
18
19
20
21
22
23
24
25
26
27
28
29
30
31
32
33
34
//AbstractQueuedSynchronizer.acquireQueued()
final boolean acquireQueued(final Node node, int arg) {
    //失败标识
    boolean failed = true;
    try {
        //中断标识
        boolean interrupted = false;
        //自旋
        for (;;) {
            //获取前一个节点
            final Node p = node.predecessor();
            //如果前一个节点是首节点,轮到当前线程获取锁
            //tryAcquire() 尝试获取锁
            if (p == head && tryAcquire(arg)) {
                //获取锁成功,将当前节点设置为首节点
                setHead(node);
                //将前一个节点的 Next 设置为 null
                p.next = null;
                //获取锁成功
                failed = false;
                return interrupted;
            }
            //是否需要阻塞
            if (shouldParkAfterFailedAcquire(p, node) &&
                //阻塞的方法
                parkAndCheckInterrupt())
                //中断标识设为 true
                interrupted = true;
        }
    } finally {
        if (failed)
            cancelAcquire(node);
    }
}

shouldParkAfterFailedAcquire() 线程是否需要被阻塞,更改线程的 waitStatus 为 SIGNAL。parkAndCheckInterrupt() 实现真正的阻塞线程。

1
2
3
4
5
6
7
8
9
10
11
12
13
14
15
16
17
18
19
20
21
22
23
24
25
26
//AbstractQueuedSynchronizer.shouldParkAfterFailedAcquire()
private static boolean shouldParkAfterFailedAcquire(Node pred, Node node) {
    //前一个节点的 waitStatus 状态,默认状态为 0,第一次进入必然走 else
    int ws = pred.waitStatus;
    // 第二次,直接返回 true
    if (ws == Node.SIGNAL)
        return true;
    if (ws > 0) {
        do {
            node.prev = pred = pred.prev;
        } while (pred.waitStatus > 0);
        pred.next = node;
    } else {
        //将waitStatus 状态设置为 SIGNAL
        compareAndSetWaitStatus(pred, ws, Node.SIGNAL);
    }
    return false;
}

//AbstractQueuedSynchronizer.parkAndCheckInterrupt()
private final boolean parkAndCheckInterrupt() {
    //阻塞当前线程
    LockSupport.park(this);
    return Thread.interrupted();
}

以上就是公平锁获取锁的全部过程,总结一下公平锁获取锁的过程:

  1. 当前线程调用 tryAcquire() 获取锁,成功则返回。
  2. 调用 addWaiter(),将线程封装成 Node 节点加入同步队列。
  3. acquireQueued() 自旋尝试获取锁,成功则返回。
  4. shouldParkAfterFailedAcquire() 将线程设置为等待唤醒状态,阻塞当前线程。
  5. 如果线程被唤醒,尝试获取锁,成功则返回,失败则继续阻塞。

非公平锁

用默认的构造方式创建一个非公平锁。lock() 方法上来就尝试抢占锁,失败则调用 acquire() 方法。

1
2
3
4
5
6
7
8
9
10
//NonfairSync.lock()
final void lock() {
    //CAS 设置 state 为 1
    if (compareAndSetState(0, 1))
        //将当前线程放入 AbstractOwnableSynchronizer 的 exclusiveOwnerThread 变量中
        setExclusiveOwnerThread(Thread.currentThread());
    else
        //设置失败,参考上一节公平锁的 acquire()
        acquire(1);
}

nonfairTryAcquire() 就没有绅士风度了,没有了公平锁 hasQueuedPredecessors() 方法。

1
2
3
4
5
6
7
8
9
10
11
12
13
14
15
16
17
18
19
20
21
22
23
24
25
26
27
28
29
//NonfairSync.tryAcquire()
protected final boolean tryAcquire(int acquires) {
    //调用 ReentrantLock 的 nonfairTryAcquire()
    return nonfairTryAcquire(acquires);
}

//ReentrantLock.nonfairTryAcquire()
final boolean nonfairTryAcquire(int acquires) {
    final Thread current = Thread.currentThread();
    int c = getState();
    //如果 state 变量为 0,用 CAS 设置 state 的值
    if (c == 0) {
        if (compareAndSetState(0, acquires)) {
            //将当前线程放入 AbstractOwnableSynchronizer 的 exclusiveOwnerThread 变量中
            setExclusiveOwnerThread(current);
            return true;
        }
    }
    //当前线程本来就持有锁,进入重入逻辑,返回 true
    else if (current == getExclusiveOwnerThread()) {
        int nextc = c + acquires;
        if (nextc < 0)
            throw new Error("Maximum lock count exceeded");
        //设置 state 变量
        setState(nextc);
        return true;
    }
    return false;
}

以上就是非公平锁获取锁,总结一下非公平锁获取锁的过程:

  1. lock() 第一次尝试获取锁,成功则返回。
  2. nonfairTryAcquire() 再次尝试获取锁。
  3. 失败则调用 addWaiter() 封装线程为 Node 节点加入同步队列。
  4. acquireQueued() 自旋尝试获取锁,成功则返回。
  5. shouldParkAfterFailedAcquire() 将线程设置为等待唤醒状态,阻塞当前线程。
  6. 如果线程被唤醒,尝试获取锁,成功则返回,失败则继续阻塞。

公平锁和非公平锁对比

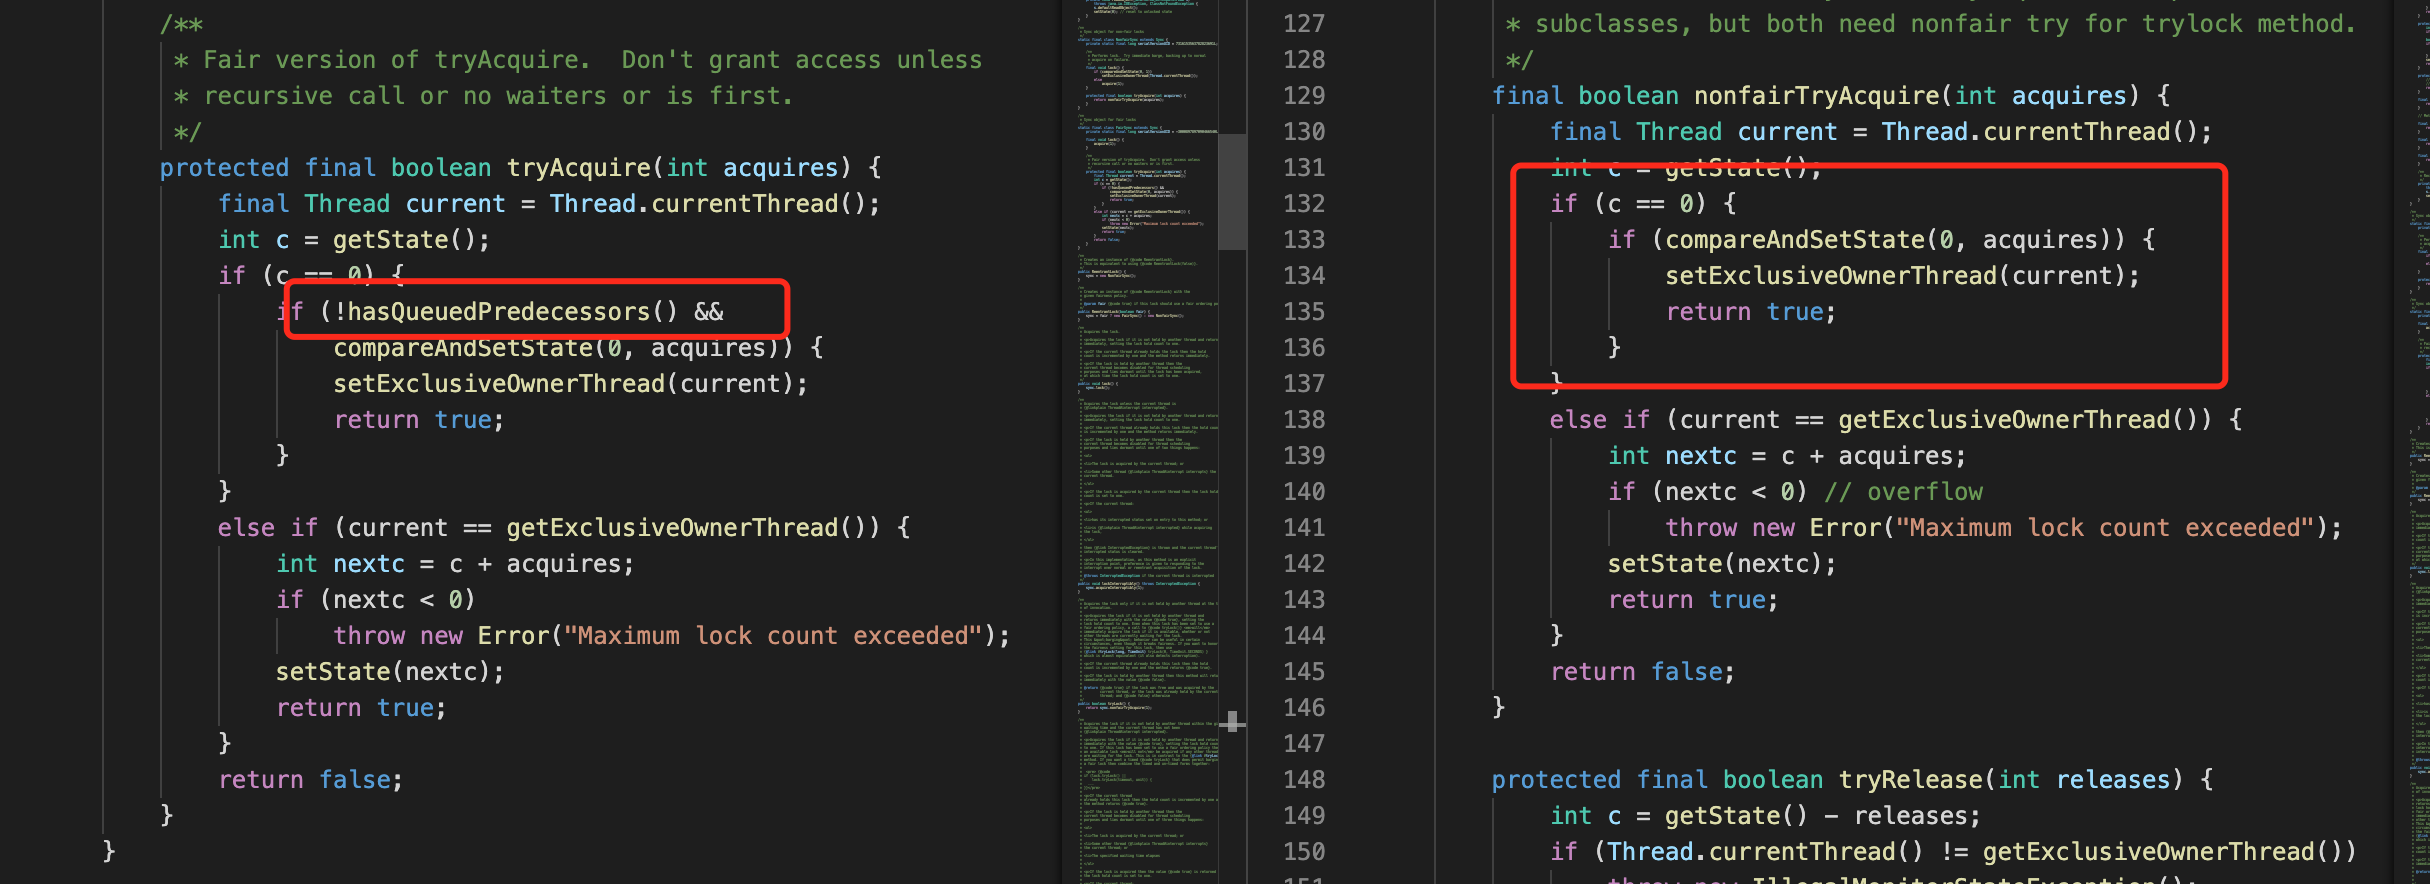
在下图源码中可以看出,公平锁多了一个 !hasQueuedPredecessors() 用来判断是否有其他线程比当前线程在同步队列中排队时间更长。除此之外,非公平锁在初始时就有 2 次获取锁的机会,然后再到同步队列中排队。

3.png

unlock() 释放锁

获取锁之后必须得释放,同一个线程不管重入了几次锁,必须得释放几次锁,不然 state 变量将不会变成 0,锁被永久占用,其他线程将永远也获取不到锁。

1
2
3
4
5
6
7
8
9
10
11
12
13
14
15
16
17
18
19
20
21
22
23
24
25
26
27
28
29
30
31
32
33
34
35
36
37
38
39
40
41
42
43
44
45
46
47
48
49
50
51
52
53
54
55
56
57
58
//ReentrantLock.unlock()
public void unlock() {
    sync.release(1);
}

//AbstractQueuedSynchronizer.release()
public final boolean release(int arg) {
    //调用 Sync 的 tryRelease()
    if (tryRelease(arg)) {
        Node h = head;
        //首节点不是 null,首节点的 waitStatus 是 SIGNAL
        if (h != null && h.waitStatus != 0)
            unparkSuccessor(h);
        return true;
    }
    return false;
}

//Sync.tryRelease()
protected final boolean tryRelease(int releases) {
    //state 变量减去 1
    int c = getState() - releases;
    //当前线程不是占有锁的线程,异常
    if (Thread.currentThread() != getExclusiveOwnerThread())
        throw new IllegalMonitorStateException();
    boolean free = false;
    //state 变量成了 0
    if (c == 0) {
        free = true;
        //将当前占有的线程设置为 null
        setExclusiveOwnerThread(null);
    }
    //设置 state 变量
    setState(c);
    return free;
}

//AbstractQueuedSynchronizer.unparkSuccessor()
private void unparkSuccessor(Node node) {
    //节点的 waitStatus 
    int ws = node.waitStatus;
    //为 SIGNAL 的时候,CAS 的方式更新为初始值 0
    if (ws < 0)
        compareAndSetWaitStatus(node, ws, 0);
    //获取下一个节点
    Node s = node.next;
    //下一个节点为空,或者 waitStatus 状态为 CANCELLED
    if (s == null || s.waitStatus > 0) {
        s = null;
        //从最后一个节点开始找出 waitStatus 不是 CANCELLED 的节点
        for (Node t = tail; t != null && t != node; t = t.prev)
            if (t.waitStatus <= 0)
                s = t;
    }
    //下一个节点不是 null,唤醒它
    if (s != null)
        LockSupport.unpark(s.thread);
}

释放锁的逻辑就是 state 必须被减去 1 直到为 0,才可以唤醒下一个线程。

总结

ReentrantLock 主要是防止资源的使用冲突,保证同一个时间只能有一个线程在使用资源。比如:文件操作,同步发送消息等等。

本文分析了 ReentrantLock 的公平锁和非公平锁以及释放锁的原理,可以得出非公平锁的效率比公平锁效率高,非公平锁初始时会 2 次获取锁,如果成功可以减少线程切换带来的损耗。在非公平模式下,线程可能一直抢占不到锁。

我是指北君,操千曲而后晓声,观千剑而后识器。感谢各位人才的:点赞、收藏和评论,我们下期更精彩!

Java Geek Tech wechat
欢迎订阅 Java 技术指北,这里分享关于 Java 的一切。