为了给公司新来的妹子说清楚线程之间的通信,我用了8种方法!--20210913

最近公司新入职了几个妹子,其中有一个妹子不停的追着我问各种问题。这次又来问我关于线程通信相关的问题。线程之间的通信以及线程之间的协作方面的面试,通常是考验一个Java程序员多线程方面的基本功。为了让妹子搞清楚线程之间的通信那些事儿,我用了8种方法!

妹子们面试的时候是否都遇到过交替打印数字字母的面试题。下面我们以交替打印12A34B…来说明线程间通信的几种方式.

分别是

  • 使用synchronized,wait,notify,notifyAll
  • Lock,Condition
  • LockSupport
  • 使用volatile关键字
  • AtomicInteger
  • 利用 Piped Stream
  • 使用CyclicBarrier
  • 利用BlockingQueue

1 使用synchronized,wait,notify,notifyAll

使用synchronized 等方法来控制共享变量,完成交替打印。

思路:

  1. 在同步方法中先判断信号量,如果不是当前需要的信号使用wait()阻塞线程。

  2. 完成打印之后切换信号变量。再唤醒所有线程。

1
2
3
4
5
6
7
8
9
10
11
12
13
14
15
16
17
18
19
20
21
22
23
24
25
26
27
28
29
30
31
32
33
34
35
36
37
38
39
40
41
42
43
44
45
46
47
48
49
50
51
52
53
54
55
56
57
58
59
60
61
62
63
64
65
66
67
68
69
70
71
72
73
74
75
76
77
78
79
80
81
82
83
84
85
public class ThreadSignaling2 {

    public static void main(String[] args) {
        NorthPrint print = new NorthPrint(new NorthSignal());
        ThreadA threadA = new ThreadA(print);
        ThreadB threadB = new ThreadB(print);
        threadA.start();
        threadB.start();

    }
public static class ThreadA extends Thread {
    private NorthPrint print;
    public ThreadA(NorthPrint print) {
        this.print = print;
    }
    @Override
    public void run() {
        print.printNumber();

    }
}

public static class ThreadB extends Thread {
    private NorthPrint print;
    public ThreadB(NorthPrint print) {
        this.print = print;
    }
    @Override
    public void run() {
        print.printChar();
    }
}
}

public class NorthSignal {
    protected boolean hasDataToProcess = false;
    public synchronized boolean hasDataToProcess(){
        return this.hasDataToProcess;
    }
    public synchronized void setHasDataToProcess(boolean hasData){
        this.hasDataToProcess = hasData;
    }
}

public class NorthPrint {
    private NorthSignal signal;
    public NorthPrint(NorthSignal signal) {
        this.signal = signal;
    }

    public synchronized void printNumber() {
        try {
            for (int i = 1; i <= 26; ) {
                if (signal.hasDataToProcess()) {
                    wait();
                }else {
                    System.out.print(i * 2 - 1);
                    System.out.print(i * 2);
                    signal.setHasDataToProcess(true);
                    i++;
                    notifyAll();
                }
            }
        } catch (InterruptedException e) {
            e.printStackTrace();
        }
    }

    public synchronized void printChar() {
        try {
            for (int i = 'A'; i <= 'Z'; ) {
                if (!signal.hasDataToProcess()) {
                    wait();
                }else {
                    System.out.print((char)i);
                    signal.setHasDataToProcess(false);
                    i++;
                    notifyAll();
                }
            }
        } catch (InterruptedException e) {
            e.printStackTrace();
        }
    }
}

2 Lock,Condition

通过使用Lock,Condition的signal() 和 await()来进行换新阻塞交替打印。

1
2
3
4
5
6
7
8
9
10
11
12
13
14
15
16
17
18
19
20
21
22
23
24
25
26
27
28
29
30
31
32
33
34
35
36
37
38
39
40
41
42
43
44
public class ThreadSignalingReentrant {
    public static void main(String[] args) {
        Lock lock = new ReentrantLock();
        Condition condition1 = lock.newCondition();
        Condition condition2 = lock.newCondition();
        new Thread(() -> {
            try{
                lock.lock();
                int i = 1;
                while (i <= 26) {
                    System.out.print(i * 2 - 1);
                    System.out.print(i * 2);
                    i++;
                    condition2.signal();
                    condition1.await();
                }
                condition2.signal();
            } catch (InterruptedException e) {
                e.printStackTrace();
            } finally {
                lock.unlock();
            }
        }).start();

        new Thread(() -> {
            try{
                lock.lock();
                char i = 'A';
                while (i <= 'Z') {
                    System.out.print(i);
                    i++;
                    condition1.signal();
                    condition2.await();
                }
                condition1.signal();
            } catch (InterruptedException e) {
                e.printStackTrace();
            } finally {
                lock.unlock();
            }

        }).start();
    }
}

3 LockSupport

LockSupport 用来创建锁和其他同步类的基本线程阻塞。当调用LockSupport.park时,表示当前线程将会等待,直至获得许可,当调用LockSupport.unpark时,必须把等待获得许可的线程作为参数进行传递,好让此线程继续运行。

其中:

  • park函数,阻塞线程,并且该线程在下列情况发生之前都会被阻塞: ① 调用unpark函数,释放该线程的许可。② 该线程被中断。③ 设置的时间到了。并且,当time为绝对时间时,isAbsolute为true,否则,isAbsolute为false。当time为0时,表示无限等待,直到unpark发生。
  • unpark函数,释放线程的许可,即激活调用park后阻塞的线程。这个函数不是安全的,调用这个函数时要确保线程依旧存活。
1
2
3
4
5
6
7
8
9
10
11
12
13
14
15
16
17
18
19
20
21
22
23
24
25
26
27
28
public class ThreadSignalingLockSupport {
    private static Thread threadA = null;
    private static Thread threadB = null;
    
    public static void main(String[] args) {
        threadA = new Thread(() -> {
            int i = 1;
            while (i <= 26) {
                System.out.print(i * 2 - 1);
                System.out.print(i * 2);
                i++;
                LockSupport.unpark(threadB);
                LockSupport.park();
            }
        });
        threadB = new Thread(() -> {
            char i = 'A';
            while (i <= 'Z') {
                LockSupport.park();
                System.out.print(i);
                i++;
                LockSupport.unpark(threadA);
            }
        });
        threadA.start();
        threadB.start();
    }
}

4 volatile

根据volatile修饰的对象在JVM内存中的可见性,完成交替打印

1
2
3
4
5
6
7
8
9
10
11
12
13
14
15
16
17
18
19
20
21
22
23
24
25
26
27
28
29
30
public class ThreadSignalingVolatile {

    enum ThreadRunFlag{PRINT_NUM, PRINT_CHAR}
    private volatile static ThreadRunFlag threadRunFlag = ThreadRunFlag.PRINT_NUM;

    public static void main(String[] args) {

        new Thread(() -> {
            int i = 1;
            while (i <= 26) {
                while(threadRunFlag == ThreadRunFlag.PRINT_CHAR){}
                System.out.print(i * 2 - 1);
                System.out.print(i * 2);
                i++;
                threadRunFlag = ThreadRunFlag.PRINT_CHAR;
            }
        }).start();

        new Thread(()->{
            char i = 'A';
            while (i <= 'Z'){
                while (threadRunFlag == ThreadRunFlag.PRINT_NUM){}
                System.out.print(i);
                i++;
                threadRunFlag = ThreadRunFlag.PRINT_NUM;
            }
        }).start();

    }
}

5 AtomicInteger

同样利用了AtomicInteger的并发特性,来完成交替打印。

1
2
3
4
5
6
7
8
9
10
11
12
13
14
15
16
17
18
19
20
21
22
23
24
25
26
27
28
public class AtomicIntegerSignal {

    private static AtomicInteger threadSignal = new AtomicInteger(1);
    public static void main(String[] args) {

        new Thread(() -> {
            int i = 1;
            while (i <= 26) {
                while(threadSignal.get() == 2){}
                System.out.print(i * 2 - 1);
                System.out.print(i * 2);
                i++;
                threadSignal.set(2);
            }
        }).start();

        new Thread(()->{
            char i = 'A';
            while (i <= 'Z'){
                while (threadSignal.get() == 1){}
                System.out.print(i);
                i++;
                threadSignal.set(1);
            }
        }).start();

    }
}

6 利用 Piped Stream

使用Stream中的Piped Stream分别控制输出,但是其运行速度极慢。

1
2
3
4
5
6
7
8
9
10
11
12
13
14
15
16
17
18
19
20
21
22
23
24
25
26
27
28
29
30
31
32
33
34
35
36
37
38
39
40
41
42
43
44
45
46
47
48
49
50
51
52
53
54
55
56
57
58
59
60
61
62
63
64
65
66
67
68
69
70
71
72
73
74
75
76
77
78
79
80
81
public class ThreadSignalPipedStream {

    private final PipedInputStream inputStream1;
    private final PipedOutputStream outputStream1;
    private final PipedInputStream inputStream2;
    private final PipedOutputStream outputStream2;
    private final byte[] MSG;

    public ThreadSignalPipedStream() {
        inputStream1 = new PipedInputStream();
        outputStream1 = new PipedOutputStream();
        inputStream2 = new PipedInputStream();
        outputStream2 = new PipedOutputStream();
        MSG = "Go".getBytes();
        try {
            inputStream1.connect(outputStream2);
            inputStream2.connect(outputStream1);
        } catch (IOException e) {
            e.printStackTrace();
        }
    }

    public static void main(String[] args) {
        ThreadSignalPipedStream signal = new ThreadSignalPipedStream();
        signal.threadA().start();
        signal.threadB().start();

    }

    public Thread threadA (){
        final String[] inputArr = new String[2];

        return new Thread() {
            String[] arr = inputArr;
            PipedInputStream in1 = inputStream1;
            PipedOutputStream out1 = outputStream1;
            @Override
            public void run() {
                int i = 1;
                while (i <= 26) {
                    try {
                        System.out.print(i * 2 - 1);
                        System.out.print(i * 2);
                        out1.write(MSG);
                        byte[] inArr = new byte[2];
                        in1.read(inArr);
                        while(!"Go".equals(new String(inArr))){ }
                        i++;
                    } catch (IOException e) {
                        e.printStackTrace();
                    }
                }
            }
        };
    }

    public Thread threadB (){
        final String[] inputArr = new String[2];
        return new Thread() {
            private String[] arr = inputArr;
            private PipedInputStream in2 = inputStream2;
            private PipedOutputStream out2 = outputStream2;
            @Override
            public void run() {
                char i = 'A';
                while (i <= 'Z'){
                    try {
                        byte[] inArr = new byte[2];
                        in2.read(inArr);
                        while(!"Go".equals(new String(inArr))){  }
                        System.out.print(i);
                        i++;
                        out2.write(MSG);
                    } catch (IOException e) {
                        e.printStackTrace();
                    }
                }
            }
        };
    }
}

7 利用BlockingQueue

BlockingQueue 通常用于一个线程生产对象,另外一个线程消费这些对象的场景。

img

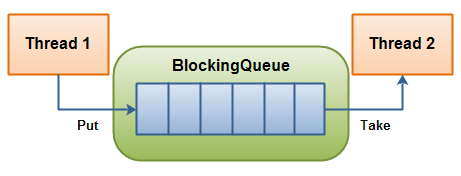
一个线程负责往里面放,另一个线程从里面取一个BlockingQueue。

线程可以持续将新对象插入到队列之中,直到队列达到可容纳的临界点。当队列到达临界点之后,线程生产者会在插入对象是进入阻塞状态,直到有另外一个线程从队列中拿走一个对象。消费线程会不停的从队列中拿出对象。如果消费线程从一个空的队列中获取对象的话,那么消费线程会处阻塞状态,直到一个生产线程把对象丢进队列。

BlockingQueue常用方法如下:

image-20210906230302480

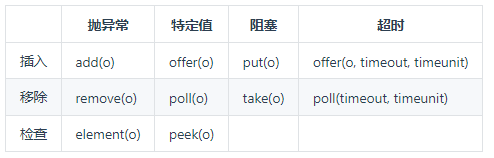
那么我们使用一个LinkedBlockingQueue来完成开始出现的题目

方法中我们使用offer,peek,poll这几个方法来完成。

1
2
3
4
5
6
7
8
9
10
11
12
13
14
15
16
17
18
19
20
21
22
23
24
25
26
27
public class ThreadSignalBlockingQueue {
    private static LinkedBlockingQueue<String> queue = new LinkedBlockingQueue<>();
    public static void main(String[] args) throws InterruptedException {
        new Thread(() -> {
            int i = 1;
            while (i <= 26) {
                System.out.print(i * 2 - 1);
                System.out.print(i * 2);
                i++;
                queue.offer("printChar");
                while(!"printNumber".equals(queue.peek())){}
                queue.poll();
            }
        }).start();

        new Thread(()->{
            char i = 'A';
            while (i <= 'Z'){
                while(!"printChar".equals(queue.peek())){}
                queue.poll();   
                System.out.print(i);
                i++;
                queue.offer("printNumber");
            }
        }).start();
    }
}

我们也可以使用两个LinkedBlockinQueue来完成,分别使用带阻塞的put,take来完成。代码如下

1
2
3
4
5
6
7
8
9
10
11
12
13
14
15
16
17
18
19
20
21
22
23
24
25
26
27
28
29
30
31
32
33
34
35
public class ThreadSignalBlockingQueue2 {
    private static LinkedBlockingQueue<String> queue1 = new LinkedBlockingQueue<>();
    private static LinkedBlockingQueue<String> queue2 = new LinkedBlockingQueue<>();
    public static void main(String[] args) throws InterruptedException {
        new Thread(() -> {
            int i = 1;
            while (i <= 26) {
                System.out.print(i * 2 - 1);
                System.out.print(i * 2);
                i++;
                try {
                    queue2.put("printChar");
                    queue1.take();
                } catch (InterruptedException e) {
                    e.printStackTrace();
                }

            }
        }).start();

        new Thread(()->{
            char i = 'A';
            while (i <= 'Z'){
                try {
                    queue2.take();
                    System.out.print(i);
                    i++;
                    queue1.put("printNumber");
                } catch (InterruptedException e) {
                    e.printStackTrace();
                }
            }
        }).start();
    }
}

8 使用CyclicBarrier

CyclicBarrier的字面意思就是可循环使用的屏障,它可以让一组线程到达一个阻塞点(屏障)时被阻塞。直到最后一个线程到达阻塞点后,屏障才会开门,然后所有被拦截的线程就可以继续运行。

CyclicBarrier中有一个barrierCommand,主要就是在所有线程到达阻塞点之后执行的一个线程。可以使用构造方法来 CyclicBarrier(int parties, Runnable barrierAction)进行构建。

关于使用CyclicBarrier进行交替打印,先来说一下思路。

  1. 利用await()方法使得每循环一次都阻塞线程。
  2. 将每次循环输出的值放到一个共享的同步list里面。
  3. 然后再使用barrierAction到达阻塞点之后进行输出。 由于list里面的值先后顺序有变化,所有先排序然后再打印。

下面我们看一下实操代码:

1
2
3
4
5
6
7
8
9
10
11
12
13
14
15
16
17
18
19
20
21
22
23
24
25
26
27
28
29
30
31
32
33
34
35
36
37
38
39
40
41
42
43
44
45
46
47
public class ThreadSignalCyclicBarrier {
    private static List<String> list =  Collections.synchronizedList(new ArrayList<>());
    public static void main(String[] args) throws Exception {
        CyclicBarrier barrier = new CyclicBarrier(2,barrierRun());

        new Thread(() -> {
            int i = 1;
            while (i <= 26) {
                list.add(String.valueOf(i * 2 - 1));
                list.add(String.valueOf(i * 2));
                i++;
                try {
                    barrier.await();
                } catch (Exception e) {
                    e.printStackTrace();
                }

            }
        }).start();

        new Thread(()->{
            char i = 'A';
            while (i <= 'Z'){
                try {
                    list.add(String.valueOf(i));
                    i++;
                    barrier.await();
                } catch (Exception e) {
                    e.printStackTrace();
                }
            }
        }).start();


    }

    public static Runnable barrierRun(){
        return new Runnable() {
            @Override
            public void run() {
                Collections.sort(list);
                list.forEach(str->System.out.print(str));
                list.clear();
            }
        };
    }
}

Demo代码GitHub: https://github.com/javatechnorth/java-study-note/tree/master/multiThread/src/main/java/org/javanorth/currency/signal

欢迎来瓢!!

总结

一口气给妹子讲了8种方法来完成交替打印的编程题目,总结一下线程通信的内容。

线程间通信大致可以分为3种:

  1. 通过共享对象,即共享内存进行通信
  2. 等待通知机制,(利用wait(),notify(),notifyAll(),Lock,以及AQS等)
  3. 利用管道输入,输出流。

相信妹子已经比较比较了解线程间通信的内容。由于妹子的问题比较多,后面哥慢慢给你讲!敬请期待。

Java Geek Tech wechat
欢迎订阅 Java 技术指北,这里分享关于 Java 的一切。