哈喽,大家好,我是指北君。
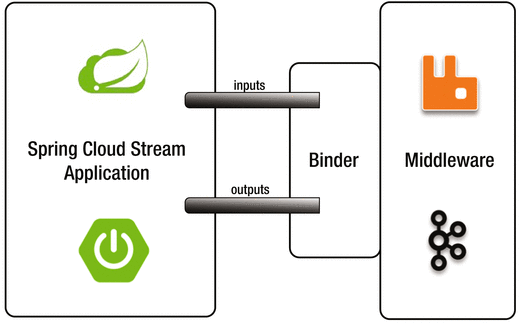
开发中,服务与服务之间通信通常会用到消息中间件,如果我们使用了某一个MQ,那么消息中间件与我们的系统算是高耦合。将来有一天,要替换成另外的MQ,我们的改动就会比较大。为了解决这个问题,我们可以使用Spring Cloud Stream 来整合我们的消息中间件,降低耦合度,使服务可以更多关注自己的业务逻辑等。
今天为大家带来一个人人可实操的SpringCloudStream集成Kafka的快速入门示例。
1 前言
SpringCloudStream是一个构建高扩展性的事件消息驱动的微服务框架。简单点说就是帮助你操作MQ,可以与底层MQ框架解耦。将来想要替换MQ框架的时候会比较容易。
Kafka是一个分布式发布 - 订阅消息系统,源于LinkedIn的一个项目,2011年成为开源Apache项目。
ZooKeeper 是 Apache 软件基金会的一个软件项目,它为大型分布式计算提供开源的分布式配置服务、同步服务和命名注册,Kafka的实现同时也依赖于zookeeper。
2 Windows搭建简单的Kafka
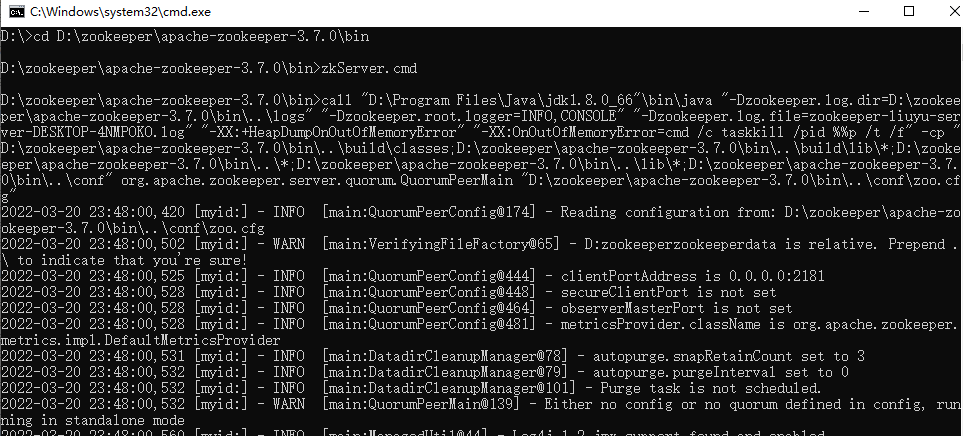
2.1 启动zookeeper
使用Kafka首先需要启动zookeeper,windows中搭建zookeeper也很简单。以下几步即可完成:
- 下载zookeeper (本文使用3.7.0版本,下载链接在文章末尾。)
- 配置基本环境变量:
- 将conf文件夹下面的 zoo_sample.cfg 重命名zoo.cfg。并修改其工作目录dataDir。
- bin文件夹下面有zkEnv.cmd有zookeeper相关的配置,其中就包括JAVA_HOME,所以系统环境变量需要配置JAVA_HOME,或者直接用Java的路径来替换。
- 启动,在bin目录下运行zkServer.cmd脚本启动zookeeper。
默认启动端口2181为。
正常启动如下:
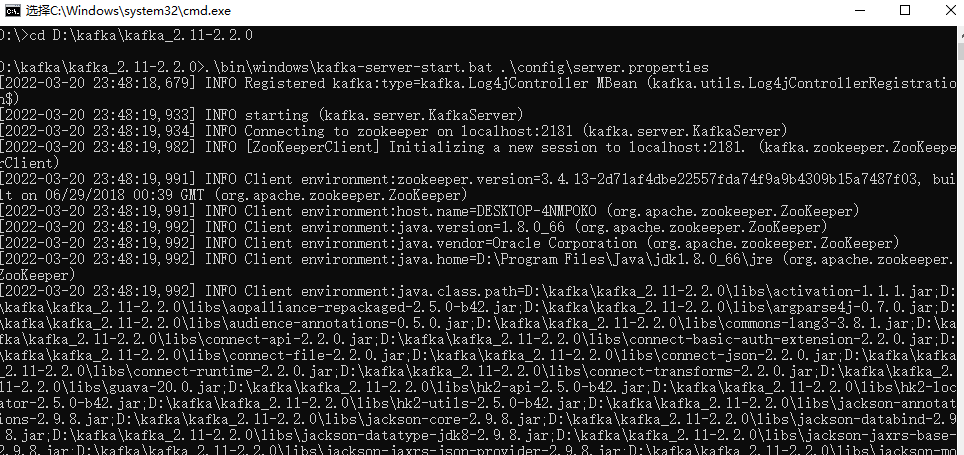
2.2 搭建Kafka
本地使用kafka同样也是如下的几个步骤:
- 下载Kafka(本文使用2.11版本,下载链接见文章末尾)
-
环境变量配置:
-
查看config文件下面的 server.properties配置文件中的zookeeper的配置
1
zookeeper.connect=localhost:2181 -
在bin/windows文件夹下面kafka-run-class.bat文件中有JAVA_HOME的配置,同样也可以直接改成系统的Java路径.
-
- 在kafka根目录下使用如下命令启动kafka,并在zookeeper中注册。
1
# .\bin\windows\kafka-server-start.bat .\config\server.properties -
创建topic,在bin\windows目录下使用如下命令。创建名称为“test”的topic
1
kafka-topics.bat --create --zookeeper localhost:2181 --replication-factor 1 --partitions 1 --topic test -
使用windows命令窗口的producer和consumer,在bin\windows目录下使用如下命令
1
2
3
4
5
6
#test topic的消息生产者 kafka-console-producer.bat --broker-list localhost:9092 --topic test #test topic的消息消费者 kafka-console-consumer.bat --bootstrap-server localhost:9092 --topic test #test topic的消息消费者(从头消费) kafka-console-consumer.bat --bootstrap-server localhost:9092 --from-beginning --topic
kafka启动windows界面如下
3 SpringCloudStream集成Kafka
3.1 引入依赖
由于我们直接使用Spring Cloud Stream 继承Kafka,官方也已经有现成的starter。
1 | |
3.2 关于kafka的配置
1 | |
3.3 消费者示例
首先需要定义SubscribableChannel 接口方法使用Input注解。
1 | |
然后简单的使用 StreamListener 监听某一通道的消息。
1 | |
cloud stream配置中绑定了对应的Kafka topic,如下
1 | |
我们使用Kafka console producer 生产消息。
1 | |
同时启动我们的示例SpringBoot项目,使用producer推送几条消息。

我们同时启动一个Kafka console consumer
1 | |
消费结果如下:

Spring Boot 项目消费消息如下:

3.4 生产者示例
首先需要定义生产者MessageChannel,这里会用到Output注解
1 | |
使用MessageChannel 发送消息。
1 | |
定义一个Rest API 来触发消息发送
1 | |
配置中关于producer的配置如下
1 | |
启动SpringBoot App, 并触发如下API call
http://localhost:8100/sendMessage/JavaNorthProducer
我们同时启动一个Kafka console consumer,这里我们使用另一个test1 topic
1 | |
console consumer消费消息如下:

总结
本章初步介绍了Spring Cloud Stream 集成Kafka的简单示例,实现了简单的发布-订阅功能。但是Spring Cloud Stream肯定还有更多的功能,我们后续还将继续深入学习更多Stream的功能。
以上示例仓库:https://github.com/javatechnorth/java-study-note/tree/master/kafka
下载链接:
https://dlcdn.apache.org/zookeeper/zookeeper-3.7.0/apache-zookeeper-3.7.0-bin.tar.gz
https://kafka.apache.org/downloads